Images
Images can be displayed in a Pebble app by adding them as a project resource.
They are stored in memory as a GBitmap while the app is running, and can be
displayed either in a BitmapLayer or by using
graphics_draw_bitmap_in_rect().
Creating an Image
In order to be compatible with Pebble, the image should be saved as a PNG file, ideally in a palettized format (see below for palette files) with the appropriate number of colors. The number of colors available on each platform is shown below:
| Platform | Number of Colors |
|---|---|
| Aplite | 2 (black and white) |
| Basalt | 64 colors |
| Chalk | 64 colors |
| Diorite | 2 (black and white) |
| Emery | 64 colors |
| Flint | 2 (black and white) |
Color Palettes
Palette files for popular graphics packages that contain the 64 supported colors are available below. Use these when creating color image resources:
Import the Image
After placing the image in the project's resources directory, add an entry to
the resources item in package.json. Specify the type as bitmap, choose a
name (to be used in code) and supply the path relative to the project's
resources directory. Below is an example:
"resources": {
  "media": [
    {
      "type": "bitmap",
      "name": "EXAMPLE_IMAGE",
      "file": "background.png"
    }
  ]
},
Specifying an Image Resource
Image resources are used in a Pebble project when they are listed using the
bitmap resource type.
Resources of this type can be optimized using additional attributes:
| Attribute | Description | Values |
|---|---|---|
memoryFormat |
Optional. Determines the bitmap type. Reflects values in the GBitmapFormat enum. |
Smallest, SmallestPalette, 1Bit, 8Bit, 1BitPalette, 2BitPalette, or 4BitPalette. |
storageFormat |
Optional. Determines the file format used for storage. Using spaceOptimization instead is preferred. |
pbi or png. |
spaceOptimization |
Optional. Determines whether the output resource is optimized for low runtime memory or low resource space usage. | storage or memory. |
An example usage of these attributes in package.json is shown below:
{
  "type": "bitmap",
  "name": "IMAGE_EXAMPLE",
  "file": "images/example_image.png"
  "memoryFormat": "Smallest",
  "spaceOptimization": "memory"
}
On all platforms memoryFormat will default to Smallest. On Aplite
spaceOptimization will default to memory, and storage on all other
platforms.
If you specify a combination of attributes that is not supported, such as a
1Bitunpalettized PNG, the build will fail. Palettized 1-bit PNGs are supported.
When compared to using image resources in previous SDK versions:
pngis equivalent tobitmapwith no additional specifiers.pbiis equivalent tobitmapwith"memoryFormat": "1Bit".pbi8is equivalent tobitmapwith"memoryFormat": "8Bit"and"storageFormat": "pbi".
Continuing to use the png resource type will result in a bitmap resource
with "storageFormat": "png", which is not optimized for memory usage on the
Aplite platform due to less memory available in total, and is not encouraged.
Specifying Resources Per Platform
To save resource space, it is possible to include only certain image resources when building an app for specific platforms. For example, this is useful for the Aplite platform, which requires only black and white versions of images, which can be significantly smaller in size. Resources can also be selected according to platform and display shape.
Read Platform-specific Resources to learn more about how to do this.
Displaying an Image
Declare a GBitmap pointer. This will be the object type the image data is
stored in while the app is running:
static GBitmap *s_bitmap;
Create the GBitmap, specifying the name chosen earlier, prefixed with
RESOURCE_ID_. This will manage the image data:
s_bitmap = gbitmap_create_with_resource(RESOURCE_ID_EXAMPLE_IMAGE);
Declare a BitmapLayer pointer:
static BitmapLayer *s_bitmap_layer;
Create the BitmapLayer and set it to show the GBitmap. Make sure to
supply the correct width and height of your image in the GRect, as well as
using GCompOpSet to ensure color transparency is correctly applied:
s_bitmap_layer = bitmap_layer_create(GRect(5, 5, 48, 48));
bitmap_layer_set_compositing_mode(s_bitmap_layer, GCompOpSet);
bitmap_layer_set_bitmap(s_bitmap_layer, s_bitmap);
Add the BitmapLayer as a child layer to the Window:
layer_add_child(window_get_root_layer(window),
                                      bitmap_layer_get_layer(s_bitmap_layer));
Destroy both the GBitmap and BitmapLayer when the app exits:
gbitmap_destroy(s_bitmap);
bitmap_layer_destroy(s_bitmap_layer);
Menu Icon in the Launcher
The new launcher in firmware 4.0+ allows developers to provide a custom icon for their watchapps and watchfaces.
![]()
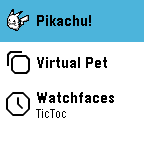
You can add a 25x25 png to the resources.media section of thepackage.json
file, and set "menuIcon": true. Please note that icons that are larger will be
rejected by the SDK.
"resources": {
  "media": [
    {
      "type": "bitmap",
      "name": "MENU_ICON",
      "file": "images/icon.png",
      "menuIcon": true
    }
  ]
}
There are four different menu icon display modes, each of which is automatically used based on the platform, type of app, and the way you specify the icon resource.
- Inversion mode is supported on the black & white platforms, for both apps and watchfaces. This is the mode used by all system icons. In this mode, the icon gets inverted depending on the background on which it is placed. Aplite requires the resource to specify 1Bit memory format and the icon to contain only black and white; transparency and color is not handled. Diorite and Flint don't require the 1Bit memory format to be set for apps (but do for watchfaces), treat any transparency in the file as white, and automatically convert any color to black & white.
- Non-inverting transparent black & white is an optional mode only for Diorite & Flint watchfaces. The icon is never inverted, and transparency works. If you provide a color icon, it is automatically converted to black & white based on luminance. This mode is enabled when the memory format is not 1Bit.
- Non-inverting transparent greyscale is the only mode for apps on color platforms. If you provide a color icon, it will be automatically converted to greyscale based on luminance.
- Non-inverting transparent color is the only mode for watchfaces on color platforms (of course, your icon doesn't have to contain color).
Therefore, to support all platforms with the fewest different icons, one option
is to provide two files icon~bw.png and icon~color.png (see
Platform-specific Resources)
and add the following to platform.json:
"resources": {
  "media": [
    {
      "file": "icon.png",
      "name": "APP_ICON",
      "type": "bitmap",
      "memoryFormat": "1Bit",
      "menuIcon": true,
      "targetPlatforms": ["aplite", "diorite", "flint"]
    },
    {
      "file": "icon.png",
      "name": "APP_ICON",
      "type": "bitmap",
      "targetPlatforms": ["basalt", "chalk", "emery", "gabbro"]
    },
  ]
}
If you wish to have a non-inverting transparent icon for Diorite and Flint (watchfaces only) you could specify those two platforms to use a different (non-1Bit) icon than Aplite or, if the automatic black & white conversion is sufficient, to use the same resource as the color platforms.
The app icons specified during submission to the appstore are independent of
this image resource (used in other places such as the mobile app and the
appstore) - the menuIcon specified will always be used in the watch
launcher list.