Your First Watchface
This page contains some instructions that are different if you're using CloudPebble or if you're using the SDK locally on your computer.
Select whether you're using CloudPebble or the SDK below to show the relevant instructions!
 Showing instructions for CloudPebble. Not using CloudPebble?
 Showing instructions for the SDK. Using CloudPebble?
The complete source code for this tutorial is available on GitHub.
In this tutorial series we will build a fully-featured digital watchface from scratch using Pebble's C API. By the end you will have a watchface with weather support, user configuration, and more. But first, we need to start with the basics.
When we are done with this first part, you should have a working watchface that looks something like this:
aplite
basalt
chalk
diorite
emery
gabbro
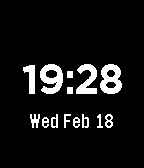

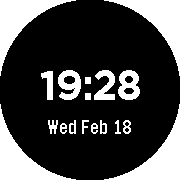

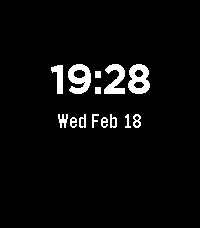
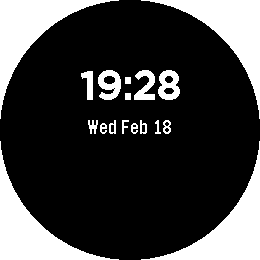
The screenshots above show the watchface on each Pebble platform. Aplite is the original Pebble and Pebble Steel, Basalt is the Pebble Time, Chalk is the Pebble Time Round, Diorite is the Pebble 2, Emery is the Pebble Time 2, Flint is Pebble 2 Duo, and Gabbro is the Pebble Round 2.
Each platform has different screen dimensions and color capabilities, so it is good practice to test your watchface on all of them.
Note: Flint is not pictured because it is basically identical to Diorite, except for some extra features that we won't be using in this tutorial.
Creating a New Project
Go to CloudPebble and click Create to start a new project. Choose C as the project type, name it "watchface", and select the Empty project template. Then go to Settings on the left and set App Kind to Watchface.
Before we begin, make sure you have the Pebble SDK installed. If you haven't done this yet, head over to the download page to get set up.
Once you are ready, navigate to a directory of your choosing and create a new project:
$ pebble new-project --simple watchface
The --simple flag gives us a clean starting point without any sample code.
Open package.json in the project root and set the watchapp object to
indicate this is a watchface:
"watchapp": {
  "watchface": true
}
The key difference between a watchface and a watchapp is that watchfaces serve as the default display on the watch. The Up and Down buttons are reserved for the Pebble timeline, so they are not available for custom behavior.
Set an author of your choosing, and we are ready to write some code!
The App Structure
Every Pebble C app follows the same basic structure. Click Add New next
to Source Files in the left sidebar to create a new C file, or open the
existing main.c. Start with the required include and three core functions:
Every Pebble C app follows the same basic structure. Open src/c/main.c and
start with the required include and three core functions:
#include <pebble.h>

static void init() {

}

static void deinit() {

}

int main(void) {
  init();
  app_event_loop();
  deinit();
}
main() is the entry point. It calls init() to set things up,
app_event_loop() to let the watchface wait for system events, and deinit()
to clean up when the app exits.
Creating a Window
Every Pebble app needs at least one Window. Declare a static pointer at the
top of the file, below #include:
static Window *s_main_window;
We prefix static variables with
s_as a naming convention to indicate they are file-scoped.
We also need two handler functions that the system will call when the Window
is being loaded and unloaded. Create these above init():
static void main_window_load(Window *window) {

}

static void main_window_unload(Window *window) {

}
Now fill in init() to create the Window, assign the handlers, set a
background color, and push it onto the window stack:
static void init() {
  // Create main Window element and assign to pointer
  s_main_window = window_create();

  // Set the background color
  window_set_background_color(s_main_window, GColorBlack);

  // Set handlers to manage the elements inside the Window
  window_set_window_handlers(s_main_window, (WindowHandlers) {
    .load = main_window_load,
    .unload = main_window_unload
  });

  // Show the Window on the watch, with animated=true
  window_stack_push(s_main_window, true);
}
Every _create() call must be matched with a _destroy() call to free memory.
Add this to deinit():
static void deinit() {
  // Destroy Window
  window_destroy(s_main_window);
}
If you click the play button on the right side of the toolbar now, your project will compile and install on the emulator. You will see a black screen. Not very exciting yet, but it confirms everything is working!
If you run pebble build && pebble install now, you will see a black screen.
Not very exciting yet, but it confirms everything is working!
Displaying the Time
To show the time, we will use a TextLayer. Declare it below the Window
pointer:
static TextLayer *s_time_layer;
Create the TextLayer inside main_window_load(). We use
PBL_IF_ROUND_ELSE() to position the layer differently on round vs
rectangular displays:
static void main_window_load(Window *window) {
  // Get information about the Window
  Layer *window_layer = window_get_root_layer(window);
  GRect bounds = layer_get_bounds(window_layer);

  // Create the time TextLayer
  s_time_layer = text_layer_create(
      GRect(0, PBL_IF_ROUND_ELSE(58, 52), bounds.size.w, 50));
  text_layer_set_background_color(s_time_layer, GColorClear);
  text_layer_set_text_color(s_time_layer, GColorWhite);
  text_layer_set_font(s_time_layer, fonts_get_system_font(FONT_KEY_BITHAM_42_BOLD));
  text_layer_set_text_alignment(s_time_layer, GTextAlignmentCenter);

  // Add it as a child layer to the Window's root layer
  layer_add_child(window_layer, text_layer_get_layer(s_time_layer));
}
And destroy it in main_window_unload():
static void main_window_unload(Window *window) {
  text_layer_destroy(s_time_layer);
}
The TextLayer is in place, but it has no text yet. We need the
TickTimerService to get the current time.
Using the TickTimerService
The TickTimerService calls a function whenever the time changes. Create a
handler above main_window_load() matching the required signature:
static void tick_handler(struct tm *tick_time, TimeUnits units_changed) {
  update_time();
}
This calls update_time(), which we will create next. The function uses
strftime() to format the current time into a buffer. The buffer is declared
static so it persists across calls - the TextLayer only stores a pointer
to the text, not a copy:
static void update_time() {
  // Get a tm structure
  time_t temp = time(NULL);
  struct tm *tick_time = localtime(&temp);

  // Write the current hours and minutes into a buffer
  static char s_time_buffer[8];
  strftime(s_time_buffer, sizeof(s_time_buffer), clock_is_24h_style() ?
                                                    "%H:%M" : "%I:%M", tick_time);

  // Display this time on the TextLayer
  text_layer_set_text(s_time_layer, s_time_buffer);
}
clock_is_24h_style() respects the user's preference for 12-hour or 24-hour
format.
Register the tick handler and display the initial time in init(), after
pushing the window:
// Make sure the time is displayed from the start
update_time();

// Register with TickTimerService
tick_timer_service_subscribe(MINUTE_UNIT, tick_handler);
MINUTE_UNIT means we get a callback every minute. You could use SECOND_UNIT
for a seconds display, but that costs extra battery.
Click the play button to compile and install - you should now see the current time!
Build and install - you should now see the current time!
Adding the Date
Let's add a second TextLayer for the date. Declare it at the top:
static TextLayer *s_date_layer;
Create it in main_window_load(), after the time layer:
// Create the date TextLayer
s_date_layer = text_layer_create(
    GRect(0, PBL_IF_ROUND_ELSE(110, 104), bounds.size.w, 30));
text_layer_set_background_color(s_date_layer, GColorClear);
text_layer_set_text_color(s_date_layer, GColorWhite);
text_layer_set_font(s_date_layer, fonts_get_system_font(FONT_KEY_GOTHIC_24_BOLD));
text_layer_set_text_alignment(s_date_layer, GTextAlignmentCenter);

// Add to Window
layer_add_child(window_layer, text_layer_get_layer(s_date_layer));
Destroy it in main_window_unload():
text_layer_destroy(s_date_layer);
Update update_time() to also set the date. Add this after the time formatting:
// Write the current date into a buffer
static char s_date_buffer[16];
strftime(s_date_buffer, sizeof(s_date_buffer), "%a %b %d", tick_time);

// Display the date
text_layer_set_text(s_date_layer, s_date_buffer);
The format string "%a %b %d" produces output like "Mon Jan 01". See the
strftime documentation
for all available format specifiers.
Conclusion
That is the basic process for creating a Pebble watchface! To recap, we:
- Created a new Pebble project configured as a watchface.
- Set up the basic app structure with
init(),deinit(), andmain(). - Created a
Windowwith load/unload handlers. - Added a
TextLayerto display the time. - Subscribed to the
TickTimerServiceto keep the time updated. - Added a second
TextLayerfor the date.
If you have problems with your code, check it against the source code for this part.
What's Next?
The design is functional but plain. In the next part we will spice things up by adding a custom font to give the watchface some personality.