Timeline Peek
This page contains some instructions that are different if you're using CloudPebble or if you're using the SDK locally on your computer.
Select whether you're using CloudPebble or the SDK below to show the relevant instructions!
 Showing instructions for CloudPebble. Not using CloudPebble?
 Showing instructions for the SDK. Using CloudPebble?
Pebble's Timeline Quick View can appear at the bottom of the screen to show upcoming events. When it does, it covers part of your watchface. In this part we will use the unobstructed area dimensions to gracefully adapt our layout - repositioning the time, date, and weather to fit in the remaining space.
emery
This section continues from Part 4.
How Timeline Quick View Works
Timeline Quick View is a system overlay that obstructs the bottom ~51 pixels of the screen (including a 2px border). Your watchface is not required to handle this, but adapting your layout gives users a better experience - the time, date, and weather stay visible instead of being hidden behind the overlay.
Note: Timeline Quick View is not currently supported for the Round platforms (gabbro), but writing compatible code ensures your watchface handles it gracefully on all platforms.
Using the Unobstructed Area
In the C SDK you would use layer_get_unobstructed_bounds() and subscribe to
three separate event handlers. In Alloy, the Poco renderer exposes the
unobstructed dimensions directly:
render.unobstructed.width- width of the area not covered by a system overlayrender.unobstructed.height- height of the area not covered by a system overlay
When there is no overlay, these are identical to render.width and
render.height. When Timeline Quick View is active,
render.unobstructed.height is smaller.
The key rule is simple: use render.width/render.height for clearing the
full screen, and render.unobstructed.width/render.unobstructed.height for
positioning content.
Listening for Resize Events
When the overlay appears or disappears, the system fires a resize event. We
just need to redraw:
watch.addEventListener("resize", drawScreen);
That is all. Unlike the C SDK where you subscribe to three separate callbacks
(.will_change, .change, .did_change), Alloy fires a single resize
event and you simply redraw using the current unobstructed dimensions.
Updating the Layout
Moving layout constants into drawScreen()
In Part 4, we precomputed the vertical positions at the top of the file:
// Remove these top-level constants:
const blockHeight = timeFont.height + dateFont.height;
const timeY = (render.height - blockHeight) / 2;
const dateY = timeY + timeFont.height;
These values were computed once at startup using render.height. Since the
unobstructed height can change at any time, we need to recompute them on every
draw. Move them inside drawScreen() and use render.unobstructed.height:
function drawScreen(event) {
    const now = event?.date ?? lastDate;
    if (event?.date) lastDate = event.date;

    render.begin();
    render.fillRectangle(black, 0, 0, render.width, render.height);

    // Compute layout positions from unobstructed area
    const blockHeight = timeFont.height + dateFont.height;
    const timeY = (render.unobstructed.height - blockHeight) / 2;
    const dateY = timeY + timeFont.height;

    // ... rest of drawing code ...
Notice that the background fill still uses render.width/render.height to
clear the entire screen, but timeY and dateY are now based on
render.unobstructed.height so the time and date stay centered in the
visible area.
Updating drawBatteryBar()
Replace render.width and render.height with their unobstructed
equivalents so the battery bar stays within the visible area:
function drawBatteryBar() {
    const barWidth = (render.unobstructed.width / 2) | 0;
    const barX = ((render.unobstructed.width - barWidth) / 2) | 0;
    const barY = render.unobstructed.height < 180 ? 6 : 20;
    const barHeight = 8;

    // ... rest unchanged ...
}
Updating element positions in drawScreen()
Every element that was positioned with render.width or render.height now
uses the unobstructed dimensions instead:
    // Bluetooth indicator
    if (!isConnected) {
        const btStr = "X";
        const btWidth = render.getTextWidth(btStr, smallFont);
        const btY = render.unobstructed.height < 180 ? 16 : 30;
        render.drawText(btStr, smallFont, red,
            (render.unobstructed.width - btWidth) / 2, btY);
    }

    // Time - centered horizontally in unobstructed area
    let width = render.getTextWidth(timeStr, timeFont);
    render.drawText(timeStr, timeFont, white,
        (render.unobstructed.width - width) / 2, timeY);

    // Date - centered horizontally in unobstructed area
    width = render.getTextWidth(dateStr, dateFont);
    render.drawText(dateStr, dateFont, white,
        (render.unobstructed.width - width) / 2, dateY);

    // Weather - positioned from bottom of unobstructed area
    const weatherY = render.unobstructed.height - smallFont.height -
        (render.unobstructed.height < 180 ? 6 : 20);
Alloy vs. C
| C (UnobstructedArea API) | Alloy | |
|---|---|---|
| Getting dimensions | layer_get_unobstructed_bounds() |
render.unobstructed.width/.height |
| Event subscription | Three handlers: .will_change, .change, .did_change |
Single resize event |
| Animation support | .change fires during animation for smooth transitions |
resize fires once; redraw with new dimensions |
| Startup handling | Must manually call handlers for initial state | Dimensions are always current |
| Code changes | Subscribe to service, implement 3 callbacks, store layer reference | Replace render.width/.height with render.unobstructed.*, add one event listener |
Testing Timeline Quick View
You can toggle Timeline Quick View using the emulator controls in CloudPebble.
You can toggle Timeline Quick View in the emulator:
$ pebble emu-set-timeline-quick-view on
$ pebble emu-set-timeline-quick-view off
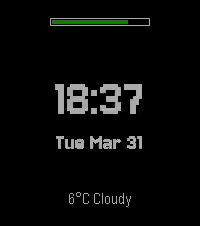
When enabled, you should see the time, date, and weather squeeze together into the remaining space. When disabled, everything returns to its original position.
Conclusion
In this part we learned how to:
- Use
render.unobstructed.widthandrender.unobstructed.heightto find the available screen space. - Listen for
resizeevents to redraw when the unobstructed area changes. - Move precomputed layout positions into the draw function so they update dynamically.
- Keep the background fill at full screen size while positioning content in the unobstructed area.
Your watchface now adapts gracefully to Timeline Quick View. Check your code against the source for this part.
What's Next?
In the next part we will add user settings - letting users choose colors, toggle
the date display, and pick temperature units - all persisted with
localStorage.