Timeline Peek
This page contains some instructions that are different if you're using CloudPebble or if you're using the SDK locally on your computer.
Select whether you're using CloudPebble or the SDK below to show the relevant instructions!
 Showing instructions for CloudPebble. Not using CloudPebble?
 Showing instructions for the SDK. Using CloudPebble?
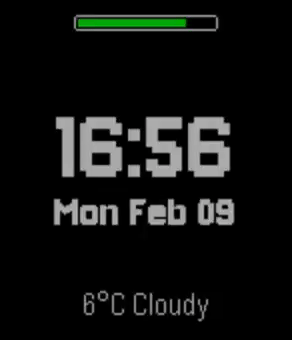
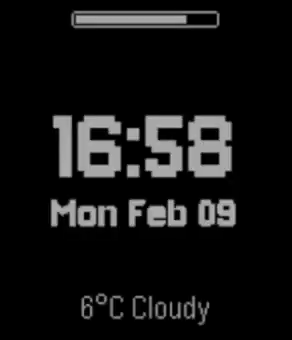
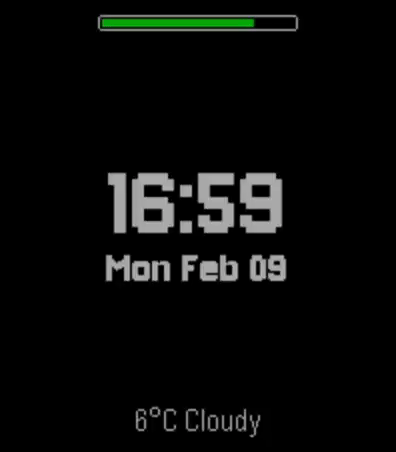
Pebble's Timeline Quick View can appear at the bottom of the screen to show
upcoming events. When it does, it covers part of your watchface. In this part
we will use the UnobstructedArea API to gracefully adapt our layout -
repositioning the time, date, and weather to fit in the remaining space.
Here is what the transition looks like:
basalt
diorite
emery
This section continues from Part 4, so be sure to re-use your code or start with that finished project.
How Timeline Quick View Works
Timeline Quick View is a system overlay that obstructs the bottom ~51 pixels of
the screen (including a 2px border). Your watchface is not required to handle
this, but with the UnobstructedArea API you can detect the change and
rearrange your layers for a better experience.
Note: Timeline Quick View is not currently supported for the Round platforms (chalk and gabbro), but writing compatible code ensures your watchface handles it gracefully on all platforms.
Getting Unobstructed Bounds
Prior to SDK 4.0, you would use layer_get_bounds() to get the full screen
size. The UnobstructedArea API adds
layer_get_unobstructed_bounds(), which returns only the area not covered by
a system overlay:
GRect full_bounds = layer_get_bounds(s_window_layer);
GRect unobstructed_bounds = layer_get_unobstructed_bounds(s_window_layer);
If there is no overlay, both return the same rectangle.
Keeping a Reference to the Window Layer
We need access to the root layer in our handler function, so store it in a file-level variable:
static Layer *s_window_layer;
Set it at the start of main_window_load():
s_window_layer = window_get_root_layer(window);
GRect bounds = layer_get_bounds(s_window_layer);
Subscribing to Unobstructed Area Events
The API provides three event handlers:
.will_change- fires before the obstruction appears or disappears.change- fires repeatedly during the animation.did_change- fires after the animation completes
We will use all three to demonstrate the full lifecycle. Subscribe at the end
of main_window_load():
UnobstructedAreaHandlers handlers = {
  .will_change = prv_unobstructed_will_change,
  .change = prv_unobstructed_change,
  .did_change = prv_unobstructed_did_change
};
unobstructed_area_service_subscribe(handlers, NULL);
Important: Construct the
UnobstructedAreaHandlersstruct before passing it tounobstructed_area_service_subscribe().
Implementing the Handlers
We use three handlers to split responsibilities cleanly:
Before the animation - .will_change
This fires once before the overlay starts moving. We hide the Bluetooth disconnect icon during the transition so it does not overlap with repositioning layers:
static void prv_unobstructed_will_change(GRect final_unobstructed_screen_area,
                                         void *context) {
  // Hide BT icon during the transition to reduce clutter
  layer_set_hidden(bitmap_layer_get_layer(s_bt_icon_layer), true);
}
Note the different signature - .will_change receives the final unobstructed
area as a GRect, so you could use it to prepare for the target layout.
During the animation - .change
This fires repeatedly as the overlay slides in or out. We recalculate all positions from the current unobstructed bounds so the layers animate smoothly:
static void prv_unobstructed_change(AnimationProgress progress, void *context) {
  GRect bounds = layer_get_unobstructed_bounds(s_window_layer);

  // Reposition time, date, and weather to fit in the available space
  int date_height = 30;
  int block_height = 56 + date_height;
  int time_y = (bounds.size.h / 2) - (block_height / 2) - 10;
  int date_y = time_y + 56;
  int weather_y = bounds.size.h - PBL_IF_ROUND_ELSE(40, 30);

  GRect time_frame = layer_get_frame(text_layer_get_layer(s_time_layer));
  time_frame.origin.y = time_y;
  layer_set_frame(text_layer_get_layer(s_time_layer), time_frame);

  GRect date_frame = layer_get_frame(text_layer_get_layer(s_date_layer));
  date_frame.origin.y = date_y;
  layer_set_frame(text_layer_get_layer(s_date_layer), date_frame);

  GRect weather_frame = layer_get_frame(text_layer_get_layer(s_weather_layer));
  weather_frame.origin.y = weather_y;
  layer_set_frame(text_layer_get_layer(s_weather_layer), weather_frame);
}
Since we use the same (bounds.size.h / 2) - (block_height / 2) - 10 formula
as in main_window_load(), the time+date block stays centered in the available
space - as the unobstructed bounds shrink, so does the offset, and all layers
naturally slide together.
After the animation - .did_change
This fires once after the overlay finishes moving. If the screen is still obstructed we keep the Bluetooth icon hidden - there is not enough room for it. If the screen is back to full size we restore the icon based on the actual connection state:
static void prv_unobstructed_did_change(void *context) {
  GRect full_bounds = layer_get_bounds(s_window_layer);
  GRect bounds = layer_get_unobstructed_bounds(s_window_layer);
  bool obstructed = !grect_equal(&full_bounds, &bounds);

  // Keep BT icon hidden when obstructed, otherwise restore based on connection
  if (obstructed) {
    layer_set_hidden(bitmap_layer_get_layer(s_bt_icon_layer), true);
  } else {
    layer_set_hidden(bitmap_layer_get_layer(s_bt_icon_layer),
      connection_service_peek_pebble_app_connection());
  }
}
Notice that each handler has a different signature - this is a common pattern in the Pebble SDK.
Handling Quick View on startup
Timeline Quick View may already be active when the watchface starts. Since the
handlers only fire during transitions, we need to apply the correct layout
immediately. Call the .change and .did_change handlers manually before
subscribing, replacing the old bluetooth_callback call:
// Apply correct layout in case Quick View is already active
prv_unobstructed_change(0, NULL);
prv_unobstructed_did_change(NULL);
This repositions the layers and sets the BT icon visibility based on the current obstruction state, so the watchface looks correct from the first frame.
How it all fits together
As the overlay slides in, the unobstructed bounds shrink, and all three text layers slide up together. The Bluetooth icon hides during the transition and stays hidden while the screen is obstructed. When the overlay goes away, the icon reappears if the phone is disconnected. Everything stays on screen - nothing is hidden, just repositioned.
Testing Timeline Quick View
You can toggle Timeline Quick View using the emulator controls in CloudPebble.
You can toggle Timeline Quick View in the emulator:
$ pebble emu-set-timeline-quick-view on
$ pebble emu-set-timeline-quick-view off
When enabled, you should see the time, date, and weather squeeze together into the remaining space. The Bluetooth icon hides during the transition and reappears based on connection state once it finishes. When disabled, everything returns to its original position.
Conclusion
In this part we learned how to:
- Use
layer_get_unobstructed_bounds()to find available screen space. - Subscribe to all three
UnobstructedAreaHandlerscallbacks. - Use
.will_changeto prepare,.changeto animate, and.did_changeto finalize. - Reposition layers dynamically to fit in the unobstructed area.
Your watchface now adapts gracefully to Timeline Quick View. Check your code against the source for this part.
What's Next?
In the next part we will add a settings page with Clay - letting users pick colors, toggle the date, and choose temperature units.