Battery Meter and Bluetooth Alerts
This page contains some instructions that are different if you're using CloudPebble or if you're using the SDK locally on your computer.
Select whether you're using CloudPebble or the SDK below to show the relevant instructions!
 Showing instructions for CloudPebble. Not using CloudPebble?
 Showing instructions for the SDK. Using CloudPebble?
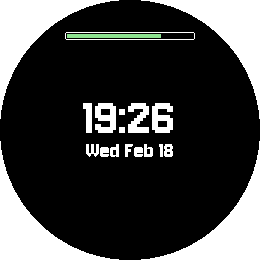
Our watchface tells the time with style, but a great watchface also gives useful information at a glance. In this part we will add two popular features: a battery meter and a Bluetooth disconnect alert.
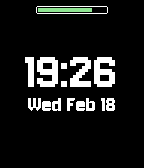
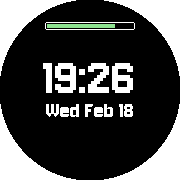
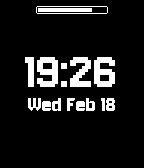
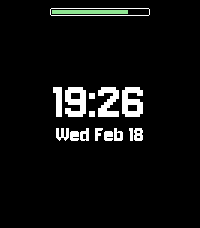
By the end of this part, your watchface will look something like this:
aplite
basalt
chalk
diorite
emery
gabbro

This section continues from Part 2, so be sure to re-use your code or start with that finished project.
The Battery Meter
Subscribing to Battery Events
The battery level is obtained using the BatteryStateService. Like the
TickTimerService, it works by calling a function whenever the battery state
changes.
Start by declaring a variable to store the current charge level at the top of your file:
static Layer *s_battery_layer;
static int s_battery_level;
Create a callback that stores the new level and triggers a redraw:
static void battery_callback(BatteryChargeState state) {
  // Record the new battery level
  s_battery_level = state.charge_percent;

  // Update the meter
  layer_mark_dirty(s_battery_layer);
}
layer_mark_dirty() tells the system to redraw the layer at the next
opportunity.
Subscribe to battery events in init():
// Register for battery level updates
battery_state_service_subscribe(battery_callback);

// Ensure battery level is displayed from the start
battery_callback(battery_state_service_peek());
battery_state_service_peek() returns the current state immediately, so we
have a value to display right away.
Drawing the Battery Bar
For the meter we will use a plain Layer with a LayerUpdateProc - a
callback that handles all the drawing for that layer. This gives us full
control over how the bar looks.
Our battery bar will have a white rounded-rectangle border and a filled bar inside that changes color based on the charge level - green when healthy, yellow when getting low, red when critical:
static void battery_update_proc(Layer *layer, GContext *ctx) {
  GRect bounds = layer_get_bounds(layer);

  // Find the width of the bar (inside the border)
  int bar_width = ((s_battery_level * (bounds.size.w - 4)) / 100);

  // Draw the border
  graphics_context_set_stroke_color(ctx, GColorWhite);
  graphics_draw_round_rect(ctx, bounds, 2);

  // Choose color based on battery level
  GColor bar_color;
  if (s_battery_level <= 20) {
    bar_color = PBL_IF_COLOR_ELSE(GColorRed, GColorWhite);
  } else if (s_battery_level <= 40) {
    bar_color = PBL_IF_COLOR_ELSE(GColorChromeYellow, GColorWhite);
  } else {
    bar_color = PBL_IF_COLOR_ELSE(GColorGreen, GColorWhite);
  }

  // Draw the filled bar inside the border
  graphics_context_set_fill_color(ctx, bar_color);
  graphics_fill_rect(ctx, GRect(2, 2, bar_width, bounds.size.h - 4), 1, GCornerNone);
}
Note:
PBL_IF_COLOR_ELSE()lets us use colors on color-capable platforms (Basalt, Chalk, Emery) while falling back to white on the monochrome Aplite and Diorite.
Create the layer in main_window_load() and assign the update proc. We center
it horizontally and place it near the top of the screen:
// Create battery meter Layer - visible bar near the top
int bar_width = bounds.size.w / 2;
int bar_x = (bounds.size.w - bar_width) / 2;
int bar_y = PBL_IF_ROUND_ELSE(bounds.size.h / 8, bounds.size.h / 28);
s_battery_layer = layer_create(GRect(bar_x, bar_y, bar_width, 8));
layer_set_update_proc(s_battery_layer, battery_update_proc);

// Add to Window
layer_add_child(window_get_root_layer(window), s_battery_layer);
Clean up in main_window_unload():
layer_destroy(s_battery_layer);
Bluetooth Disconnect Alert
Subscribing to Connection Events
The ConnectionService notifies us when the Bluetooth connection changes. We
will show an icon when disconnected and vibrate to alert the user.
Create a callback:
static void bluetooth_callback(bool connected) {
  // Show icon if disconnected
  layer_set_hidden(bitmap_layer_get_layer(s_bt_icon_layer), connected);

  if (!connected) {
    // Issue a vibrating alert
    vibes_double_pulse();
  }
}
When connected is true, the icon is hidden. When false, it is shown and
the watch vibrates with a double pulse.
Subscribe in init():
// Register for Bluetooth connection updates
connection_service_subscribe((ConnectionHandlers) {
  .pebble_app_connection_handler = bluetooth_callback
});
Adding the Disconnect Icon
We need a small bitmap image to show when disconnected. Here is the icon we will use:
![]()
In CloudPebble, click Add New next to Resources, upload the image,
set the Resource Type to Bitmap, and set the Identifier to
IMAGE_BT_ICON.
Save this image to resources/images/bt-icon.png in your project.
Add it to the media array in package.json:
{
  "type": "bitmap",
  "name": "IMAGE_BT_ICON",
  "file": "images/bt-icon.png"
}
Declare the GBitmap and BitmapLayer at the top of your file:
static BitmapLayer *s_bt_icon_layer;
static GBitmap *s_bt_icon_bitmap;
Create both in main_window_load():
// Create the Bluetooth icon GBitmap
s_bt_icon_bitmap = gbitmap_create_with_resource(RESOURCE_ID_IMAGE_BT_ICON);

// Create the BitmapLayer to display the GBitmap - below the battery bar, centered
int bt_y = bar_y + 12;
s_bt_icon_layer = bitmap_layer_create(GRect((bounds.size.w - 30) / 2, bt_y, 30, 30));
bitmap_layer_set_bitmap(s_bt_icon_layer, s_bt_icon_bitmap);
bitmap_layer_set_compositing_mode(s_bt_icon_layer, GCompOpSet);

// Add to Window
layer_add_child(window_get_root_layer(window), bitmap_layer_get_layer(s_bt_icon_layer));
Show the correct initial state at the end of main_window_load():
// Show the correct state of the BT connection from the start
bluetooth_callback(connection_service_peek_pebble_app_connection());
Clean up in main_window_unload():
gbitmap_destroy(s_bt_icon_bitmap);
bitmap_layer_destroy(s_bt_icon_layer);
Testing in the Emulator
Click the play button to compile and install your watchface in the CloudPebble emulator.
Build and install your watchface as usual:
pebble build && pebble install --emulator emery
Once the watchface is running, you can test the battery and Bluetooth features without needing a real watch:
Setting the Battery Level
In the CloudPebble emulator, use the gear menu to adjust the battery level. Try a few different values to see the bar color change.
Use pebble emu-set-battery to change the simulated battery level. Try a few
different values to see the bar color change:
pebble emu-set-battery --percent 80
pebble emu-set-battery --percent 30
pebble emu-set-battery --percent 10
You should see the bar go from green to yellow to red as the level decreases.
Toggling Bluetooth
In the CloudPebble emulator, use the gear menu to toggle the Bluetooth connection on and off.
Use pebble emu-bt-connection to simulate a Bluetooth disconnect and
reconnect:
pebble emu-bt-connection --connected no
pebble emu-bt-connection --connected yes
When you disconnect, the Bluetooth icon should appear and the watch should vibrate. When you reconnect, the icon should disappear.
Note: The emulator might take a few seconds before it realizes the connection has been lost. This is normal. Just wait a moment and the icon will appear.
Conclusion
In this part we learned how to:
- Subscribe to the
BatteryStateServicefor charge level updates. - Draw custom graphics using a
Layerwith aLayerUpdateProc. - Use color-coded battery levels with
PBL_IF_COLOR_ELSE(). - Subscribe to the
ConnectionServicefor Bluetooth events. - Show/hide layers and trigger vibration alerts.
- Test battery and Bluetooth features using the emulator.
Your watchface now shows the battery level and alerts you when the phone disconnects. Check your code against the source for this part.
What's Next?
In the next part we will add weather information by fetching data from the Open-Meteo API - our first foray into phone-watch communication.