Customizing Your Watchface
This page contains some instructions that are different if you're using CloudPebble or if you're using the SDK locally on your computer.
Select whether you're using CloudPebble or the SDK below to show the relevant instructions!
 Showing instructions for CloudPebble. Not using CloudPebble?
 Showing instructions for the SDK. Using CloudPebble?
In the previous part we created a basic watchface that displays the time and
date using Bitham-Bold. It works, but it looks like every other watchface out
there. Let's fix that by switching to a custom font - the same Jersey font used
in the C watchface tutorial - and improving the layout.
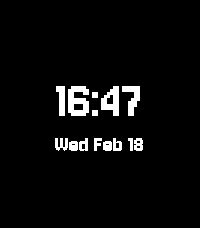
By the end of this part, your watchface will look something like this:
emery
gabbro
This section continues from Part 1, so be sure to re-use your code or start with that finished project.
Adding a Custom Font
Alloy supports custom TrueType fonts through the Moddable SDK's font pipeline.
The build system converts .ttf files into optimized bitmap resources that Poco
can render efficiently.
Getting the Font File
Download Jersey10-Regular.ttf (it's a free Google Font).
In CloudPebble, click Add New next to Resources in the left sidebar.
In the upload dialog, leave the path prefix as assets/, select your
Jersey10-Regular.ttf file, and click Upload.
Place the font file in your project:
src/
  embeddedjs/
    assets/
      Jersey10-Regular.ttf
    main.js
    manifest.json
Declaring Font Resources
Having the font file in your project is not enough on its own - we need to tell
the Moddable build system how to process it. Font files must be declared in
manifest.json with a size and character set so the build system can convert
them into optimized bitmap resources.
Open manifest.json in the Embedded JS section of the sidebar. Update
the resources section to declare the font at the two sizes we need:
Create src/embeddedjs/manifest.json (or update it if it already exists).
Add the font to the resources section at the two sizes we need:
{
    "include": [
        "$(MODDABLE)/examples/manifest_mod.json"
    ],
    "modules": {
        "*": "./main.js"
    },
    "resources": {
        "*-alpha": [
            {
                "source": "./assets/Jersey10-Regular",
                "size": 56,
                "monochrome": true,
                "blocks": ["Basic Latin"]
            },
            {
                "source": "./assets/Jersey10-Regular",
                "size": 24,
                "monochrome": true,
                "blocks": ["Basic Latin"]
            }
        ]
    }
}
Key properties:
source- path to the.ttffile (without the extension), relative to the manifestsize- font size in pixels to render atmonochrome-truefor crisp 1-bit rendering (ideal for Pebble)blocks- which Unicode character blocks to include."Basic Latin"covers the digits, letters, and punctuation we need. Including only the characters you need saves memory.
We declare the font at two sizes: 56 for the time display (same as the C
tutorial's FONT_JERSEY_56) and 24 for the date.
Loading Custom Fonts in Code
In the C SDK, you load a custom font with fonts_load_custom_font(). In Alloy,
you load the two generated resource files (.fnt for metrics, -alpha.bm4 for
pixel data) and combine them:
import parseBMF from "commodetto/parseBMF";
import parseRLE from "commodetto/parseRLE";

function getFont(name, size) {
    const font = parseBMF(new Resource(`${name}-${size}.fnt`));
    font.bitmap = parseRLE(new Resource(`${name}-${size}-alpha.bm4`));
    return font;
}
Now replace the built-in font declarations with custom font loading:
// Was: const timeFont = new render.Font("Bitham-Bold", 42);
// Was: const dateFont = new render.Font("Gothic-Bold", 24);
const timeFont = getFont("Jersey10-Regular", 56);
const dateFont = getFont("Jersey10-Regular", 24);
The returned font object works exactly like a built-in font - you can pass it
to render.drawText(), render.getTextWidth(), and read its .height
property.
Centering the Layout
In Part 1 we positioned the time and date using hardcoded offsets. Let's properly center the time+date block vertically by calculating positions based on the font metrics.
Add these calculations at the top level, after the font declarations:
// Precompute layout positions
const blockHeight = timeFont.height + dateFont.height;
const timeY = (render.height - blockHeight) / 2;
const dateY = timeY + timeFont.height;
The height property on a font gives the line height in pixels. We center the
combined block on screen by computing half the total height.
Since these values only depend on the font sizes and screen dimensions, we compute them once at startup rather than every frame. This is a good habit for embedded development - precompute what you can.
Now update the draw() function to use timeY and dateY:
function draw(event) {
    const now = event.date;

    render.begin();
    render.fillRectangle(black, 0, 0, render.width, render.height);

    // Format time as HH:MM
    const hours = String(now.getHours()).padStart(2, "0");
    const minutes = String(now.getMinutes()).padStart(2, "0");
    const timeStr = `${hours}:${minutes}`;

    // Draw time centered
    let width = render.getTextWidth(timeStr, timeFont);
    render.drawText(timeStr, timeFont, white,
        (render.width - width) / 2, timeY);

    // Format date as "Mon Jan 01"
    const dayName = DAYS[now.getDay()];
    const monthName = MONTHS[now.getMonth()];
    const dateStr = `${dayName} ${monthName} ${String(now.getDate()).padStart(2, "0")}`;

    // Draw date centered below time
    width = render.getTextWidth(dateStr, dateFont);
    render.drawText(dateStr, dateFont, white,
        (render.width - width) / 2, dateY);

    render.end();
}
Click the play button to compile and install. You should see the watchface now uses Jersey - the same distinctive font from the C tutorial - with the time and date properly centered as a block.
Compile and install with pebble build && pebble install. You should see the
watchface now uses Jersey - the same distinctive font from the C tutorial - with
the time and date properly centered as a block.
C vs. Alloy Custom Fonts
| C SDK | Alloy | |
|---|---|---|
| Font file | .ttf in resources/fonts/ |
.ttf in src/embeddedjs/assets/ |
| Declaration | package.json resources array |
manifest.json *-alpha resources |
| Loading | fonts_load_custom_font() |
parseBMF() + parseRLE() |
| Character subsetting | All glyphs included | Specify blocks or characters |
| Cleanup | fonts_unload_custom_font() |
Automatic (garbage collected) |
Experimenting
Here are some things you can try:
- Switch to a different TTF font - any TrueType font works.
- Change the font sizes to see how the layout adapts.
- Add a third font size for a different text element.
- Try different
blocksvalues like"Latin Extended-A"for accented characters.
Tip: Use
"monochrome": truefor sharp text on Pebble's display. Omit it for anti-aliased rendering on higher-color displays.
Conclusion
In this part we learned how to:
- Add a custom TrueType font to an Alloy project.
- Declare font resources in
manifest.jsonwith character subsetting. - Load custom fonts with
parseBMFandparseRLE. - Center the time+date block vertically using font metrics.
- Precompute layout positions for better performance.
Your watchface now has the same distinctive Jersey look as the C tutorial. Check your code against the source for this part if you run into any issues.
What's Next?
In the next part we will add a battery meter and connection disconnect alerts to give users useful information at a glance.